I’ve been writing about implementing the nuts and bolts of the Bitcoin protocol in Elixir, and while I’ve developed a rough understanding of how Bitcoin works at a fundamental level, Bitcoin’s peer-to-peer network, the thing that makes block propagation possible, has always felt like a mysterious black box.
The Bitcoin white paper waves its hands over the implementation of the network, and even Andreas Antonopoulos’ Mastering Bitcoin skims over the implementation details of building a network-ready Bitcoin node.
While its true that the workings of this network are completely tangential to the workings of Bitcoin itself, I still find it extremely interesting. Since I first started diving into the world of Bitcoin development, I’ve wanted to build a simple node that connects to the network.
The Elixir programming language gives us some fantastic tools to implement a server in the peer-to-peer network. Let’s see how far they can take us!
Constructing our GenServer
Since this is our first foray into Bitcoin’s peer-to-peer network, we’ll stick to simple goals. Let’s lay down a list of things we’d like to accomplish:
- Create and maintain a connection to a single Bitcoin node.
- Fetch and count the list of that node’s peers.
These goals help inform us about the architecture of our final solution. Since we’re only attempting to connect to a single Bitcoin node, we should be able to model our node nicely with a single GenServer.
We’ll start by creating a new module, BitcoinNetwork.Node, to house our new GenServer:
defmodule BitcoinNetwork.Node do
  use GenServer
end
Next, we’ll tell our Node which Bitcoin peer node we want to connect to by passing in a tuple of the target node’s ip and port:
def start_link({ip, port}) do
  GenServer.start_link(__MODULE__, %{ip: ip, port: port})
end
Lastly, we’ll pass ip and port along to our init/1 function within a map. For now, we’ll simply log our intentions to connect to the specified node:
def init(state = %{ip: ip, port: port}) do
  [:bright, "Connecting to #{BitcoinNetwork.IP.to_string(ip)}:#{port}."]
  |> log()
end
The log/1 helper function adds some extra debug information to our log output, and uses IO.ANSI.format/2 to inject color into our logs:
defp log(message) do
  [:bright, :black, "[#{inspect(self())}] ", :reset, message]
  |> IO.ANSI.format()
  |> IO.puts()
end
Supervising our GenServer
Now that we’ve sketched out its basic shape, we can spawn an instance of our BitcoinNetwork.Node GenServer when our application starts up. We’ll modify the start/2 callback in our application’s entry point module, BitcoinNetwork.Application, to create a :one_for_one supervisor that supervises a single instance of our BitcoinNetwork.Node GenServer:
def start(_type, _args) do
  Supervisor.start_link(
    [
      {BitcoinNetwork.Node,
       {Application.get_env(:bitcoin_network, :ip),
        Application.get_env(:bitcoin_network, :port)}}
    ],
    strategy: :one_for_one
  )
end
We’re pulling the ip and port of the Bitcoin node we’re trying to connect to from our application’s configuration. We should set those values in our config.exs file:
config :bitcoin_network, ip: <<
    0, 0, 0, 0, 0, 0, 0, 0, 0, 0, 0xFF, 0xFF,
    127, 0, 0, 1
  >>
config :bitcoin_network, port: 18333
For now, we’ll assume that we’re trying to connect to a testnet Bitcoin node running on localhost:18333. This port and address can be changed to point to any node on the Bitcoin network.
Working with IPs
You might have noticed that in our initial logging statement made a call out to the BitcoinNetwork.IP.to_string/1 function, and our application configuration specified the IP address of the node we’re connecting to as a binary.
The Bitcoin network supports both IPv4 and IPv6 addresses, and expects these addresses to be represented in their binary form when sent across the network, so for convenience we’ll represent all IP addresses in our application as sixteen-byte binaries. These binaries can be difficult to work with, so we’ll create a few helper functions in the BitcoinNetwork.IP module to make them easier to handle.
First, we’ll need to see the IP address of the peer node we’re connecting to, so we’ll need some way of transforming the IP address binary into a string. See BitcoinNetwork.IP.to_string/1:
def to_string(binary) do
  binary
  |> :binary.bin_to_list()
  |> Enum.chunk_every(4)
  |> Enum.map(&:binary.list_to_bin/1)
  |> Enum.map(&Base.encode16/1)
  |> Enum.join(":")
end
The Erlang tools we’ll use to manage our TCP connections will expect IP addresses in the form of eight-element tuples, rather than a binaries. BitcoinNetwork.IP.to_tuple/1 will handle that conversion for us:
def to_tuple(binary) do
  binary
  |> :binary.bin_to_list()
  |> Enum.chunk_every(2)
  |> Enum.map(&:binary.list_to_bin/1)
  |> Enum.map(&:binary.decode_unsigned/1)
  |> List.to_tuple()
end
Now we can freely shift between our base binary representation and the strings and tuple forms we’ll need to log addresses and connect to our nodes.
Hello, Bitcoin Network
If we were to spin up our application at this point, we’d see our log statement about how our BitcoinNetwork.Node GenServer is attempting to connect to our local Bitcoin node.

The first run of our application.
Unfortunately, nothing is actually happening. Let’s fix that.
Our first step in communicating with a Bitcoin node is connecting to it. The Bitcoin protocol plays out over TCP, so we’ll use Erlang’s :gen_tcp to manage our TCP connection to our peer node.
In our init/1 callback, let’s add a call to :gen_tcp.connect/3 that connect to our specified ip and port:
{:ok, socket} =
  :gen_tcp.connect(BitcoinNetwork.IP.to_tuple(ip), port, [:binary, active: true])
We’re specifying a :binary option on our connection, which means that we want any incoming packets to be delivered as binaries, rather than lists of bytes. We’re also specifying that our connection is active, which means that incoming messages will be sent to the current processes as messages which we’ll need to handle in handle_info/2 callbacks.
As an aside, pattern matching on an :ok tuple works fine for now, but a more robust solution would more gracefully handle connection failures. Failing to connect to a Bitcoin node is a fairly common occurance.
Once connected to our node, we’ll add the resulting socket to our process’ state and return from our init/1 callback:
{:ok, Map.put_new(state, :socket, socket)}
Now if we spin up our application, if all goes well, we’ll actually be connected to a Bitcoin node!
Building a Version Message
Opening a TCP connection to a Bitcoin node doesn’t get us far. Initially, the node we connect to won’t acknowledge our presence until we send it a “version” message. This messages acts as a handshake and introduces ourselves to the new node.
Let’s create a BitcoinNetwork.Protocol.Version struct to represent our version message:
defmodule BitcoinNetwork.Protocol.Version do
  defstruct version: nil,
            services: nil,
            timestamp: nil,
            recv_ip: nil,
            recv_port: nil,
            from_ip: nil,
            from_port: nil,
            nonce: nil,
            user_agent: nil,
            start_height: nil
end
Next, we’ll create a BitcoinNetwork.Protocol protocol that defines a serialize/1 function. We’ll use this protocol to establish a serialization interface that will be implemented by all of our network structure representations:
defprotocol BitcoinNetwork.Protocol do
  def serialize(_)
end
We’ll start by creating an implementation of that serialize/1 function for our Version struct:
defimpl BitcoinNetwork.Protocol, for: BitcoinNetwork.Protocol.Version do
  def serialize(version) do
    <<
      version.version::32-little,
      version.services::64-little,
      version.timestamp::64-little,
      Protocol.serialize(%VersionNetAddr{
        services: version.services,
        ip: version.recv_ip,
        port: version.recv_port
      })::binary,
      Protocol.serialize(%VersionNetAddr{
        services: version.services,
        ip: version.from_ip,
        port: version.from_port
      })::binary,
      version.nonce::64-little,
      Protocol.serialize(%VarStr{value: version.user_agent})::binary,
      version.start_height::32-little
    >>
  end
end
We’re using the little binary modifier to specify which fields should be encoded in little endian format, as specified by the Bitcoin protocol specifications.
We’re also including the serialized binaries of sub-types, such as the “version network addresses” (VersionNetAddr), and the “variable length string” (VarStr). Those structures are implemented similarly to our Version struct and corresponding serialize/1 implementation.
Composing our Message
Now that we’ve fleshed out our Version module and its corresponding serialize/1 implementation, we can generate a serialized version binary:
Protocol.serialize(%Version{
  version: 31900,
  services: 1,
  ...
})
However, this isn’t quite ready to send across the network to our peer node. First, we need to wrap the serialized binary with some additional metadata about the message being sent.
Let’s create a new struct called BitcoinNetwork.Protocol.Message to represent this metadata:
defmodule BitcoinNetwork.Protocol.Message do
  defstruct magic: nil, command: nil, size: nil, checksum: nil, payload: nil
end
Once again we’ll define an implementation of our serialize/1 function that transforms this struct into a properly encoded binary:
def serialize(%Message{command: command, payload: payload}) do
  <<
    Application.get_env(:bitcoin_network, :magic)::binary,
    String.pad_trailing(command, 12, <<0>>)::binary,
    byte_size(payload)::32-little,
    :binary.encode_unsigned(Message.checksum(payload))::binary,
    payload::binary
  >>
end
The magic field is a four-byte binary used to delineate packets send through the Bitcoin network. Since we’re connecting to a testnet Bitcoin node, we’ll need to use the byte sequence specific to the testnet:
config :bitcoin_network, magic: <<0x0B, 0x11, 0x09, 0x07>>
The Message.checksum/1 helper function double-hashes its input and returns the first four bytes of the resulting hash:
def checksum(payload) do
  <<checksum::32, _::binary>> =
    payload
    |> hash(:sha256)
    |> hash(:sha256)

  checksum
end
With the Message module’s implementation of serialize/1, we have everything we need to construct a network-ready version message:
Protocol.serialize(%Message{
  command: "version",
  payload: Protocol.serialize(%Version{
    version: 31900,
    services: 1,
    ...
  })
})
This is fine, but there’s some repetition here we can do without. Let’s write a serialize/2 function on the Message module that simplifies things a bit:
def serialize(command, payload) do
  Protocol.serialize(%Message{
    command: command,
    payload: Protocol.serialize(payload)
  })
end
This is where our Protocol shines. Because we’ve defined an implementation of serialize/1 for every type of structure we’d send across the network, we can serialize it by passing it to Protocol.serialize/1 without needing to know its type.
Let’s use our simpler interface to generate our network-ready, serialized version message:
Message.serialize("version", %Version{
  version: 31900,
  services: 1,
  ...
})
Beautiful.
Sending Version
Now that we’ve constructed the version message we want to send to our peer node, all that’s left to do is send it! In our init/1 callback in Node, we’ll construct our serialized message binary and send it to our peer node with a call to a send_message/1 helper function:
:ok =
  Message.serialize("version", %Version{
    version: 31900,
    services: 1,
    timestamp: :os.system_time(:seconds),
    recv_ip: ip,
    recv_port: port,
    from_ip: <<>>,
    from_port: 0,
    nonce: :binary.decode_unsigned(:crypto.strong_rand_bytes(8)),
    user_agent: "Elixir rules!",
    start_height: 1
  })
  |> send_message(socket)
The send_message/2 function simply prints the message being sent and uses :gen_tcp.send/2 to send it to our peer node through the provided socket:
defp send_message(message, socket) do
  print_message(message, [:bright, :yellow])
  :gen_tcp.send(socket, message)
end
Lastly, print_message/2 uses our previously implemented Hexdump module to print a hex dump of the message being sent:
defp print_message(data, colors) do
  output =
    data
    |> Hexdump.to_string()

  (colors ++ ("\n" <> output <> "\n"))
  |> IO.ANSI.format()
  |> IO.puts()

  data
end
Now if we start up our application, our Node GenServer will connect to our peer Bitcoin node and send our version message.
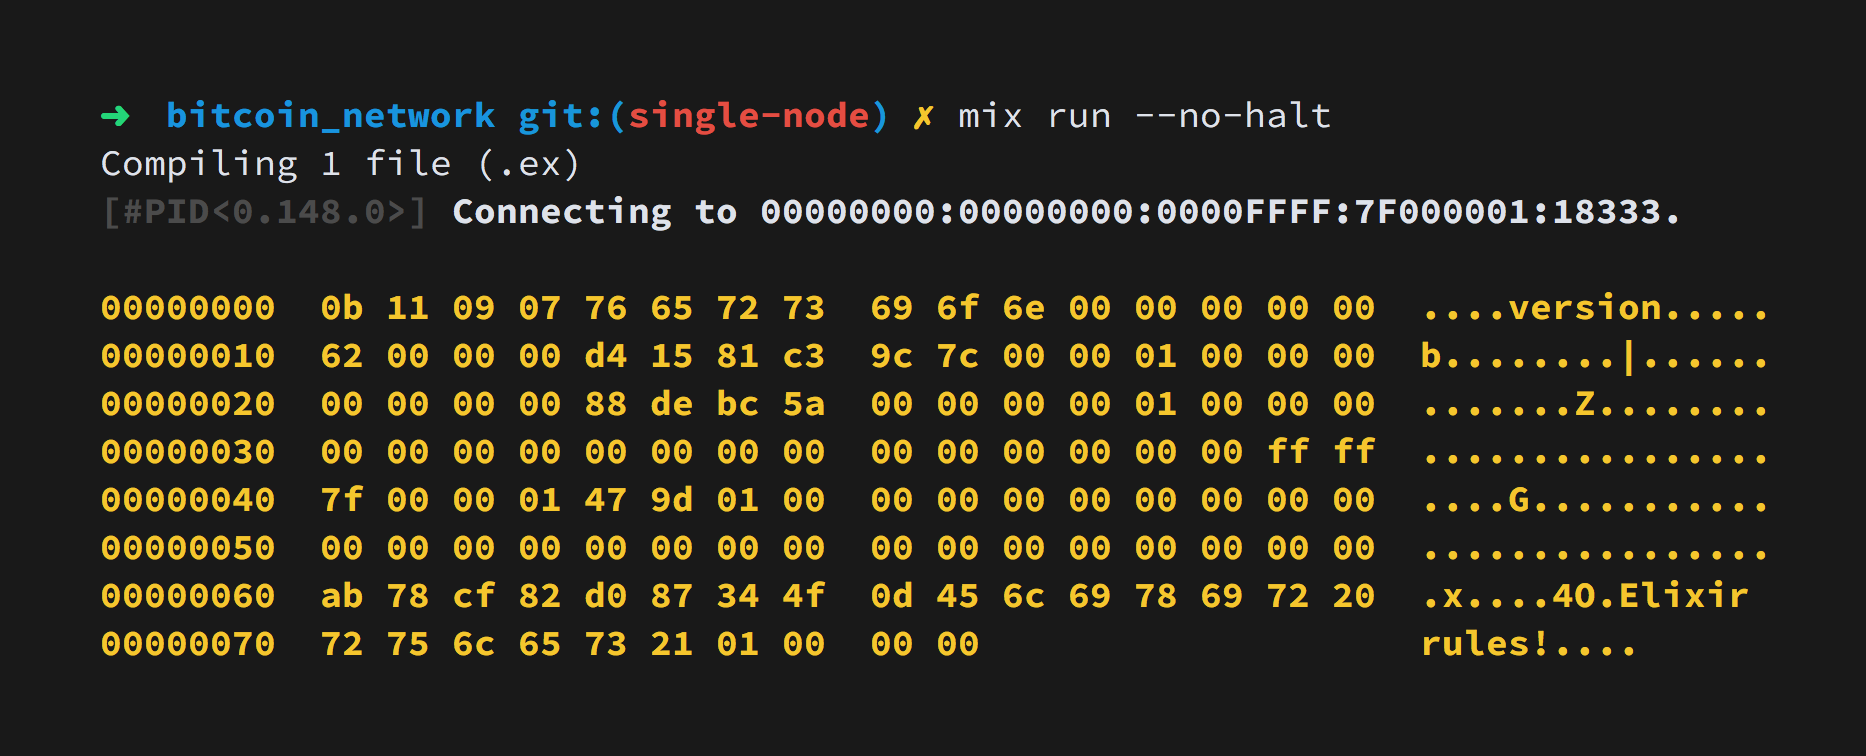
Inspecting our sent version message.
Processing Responses
If everything goes well, once our peer node receives our initial version message, it will send a message in response. In order to receive these responses from our peer node, we’ll have to implement a handle_info/2 callback on our Node GenServer that listens for :tcp messages and processes the incoming binary.
Unfortunately, processing incoming TCP messages is sightly more complicated that it seems. Because TCP is a streaming protocol, no guarantees are made that a single message will be delivered per packet, or that an entire message will be delivered in a single packet. Multiple messages may arrive smooshed into a single packet, a single message may be spread across multiple packets, or any combination of the two might occur.
To accommodate this, we’ll need to build up a buffer of every packet we receive from our peer node and parse full messages out of this running buffer as they’re completed.
We’ll use a field called rest in our GenServer’s state to represent our message buffer. We’ll initially set this to "" in our init/1 callback:
{:ok,
 state
 |> Map.put_new(:socket, socket)
 |> Map.put_new(:rest, "")}
Next, we’ll add a handle_info/2 callback that processes incoming packets sent by our peer Bitcoin node:
def handle_info({:tcp, _port, data}, state = %{rest: rest}) do
end
To process incoming messages, we first prepend rest to the data received from our peer node and pass this binary data into a function called chunk/2:
{messages, rest} = chunk(rest <> data)
Our chunk/2 helper function recursively parses fully-formed messages from our buffer and returns those messages along with the remaining, unparsed binary.
defp chunk(binary, messages \\ []) do
  case Message.parse(binary) do
    {:ok, message, rest} ->
      chunk(rest, messages ++ [message])

    nil ->
      {messages, binary}
  end
end
The Message.parse/1 function is essentially the opposite of the Message module’s implementation of serialize/1. Given a properly formed binary, parse/1 returns a fully populated Message struct, along with any unparsed trailing binary data.
def parse(binary) do
  with <<
         magic::32-little,
         command::binary-size(12),
         size::32-little,
         checksum::32-big,
         payload::binary-size(size),
         rest::binary
       >> <- binary do
    {:ok,
     %Message{
       magic: magic,
       command:
         command
         |> :binary.bin_to_list()
         |> Enum.reject(&(&1 == 0))
         |> :binary.list_to_bin(),
       size: size,
       checksum: checksum,
       payload: parse_payload(command, payload)
     }, rest}
  else
    _ -> nil
  end
end
If the message’s binary is incomplete, Message.parse/1 will return nil, and our chunk/1 function will return the accumulated list of messages.
Once we have a list of received Message structs, we’ll filter our any that have incorrect checksums using a Message.verify_checksum/1 helper, and asynchronously cast the rest to ourselves for further processing:
messages
|> Enum.filter(&Message.verify_checksum/1)
|> Enum.map(&GenServer.cast(self(), &1))
Finally, we’ll return from our handle_info/2 callback, updating rest with the unused trailing binary data we’ve accumulated:
{:noreply, %{state | rest: rest}}
Receiving Verack
Now that we’ve got a system in place to receive and parse messages sent by our peer node, we’re in a good position to handle the reply to our initial version message.
Whenever a Bitcoin node receives a version message, it’ll send a “verack” message in response. When our Node processes this response, it’ll parse the verack message into a Message struct with a command value of "verack", and asynchronously cast that Message to itself.
We’ll need to set up a handle_cast/2 callback to listen for it:
def handle_cast(%Message{command: "verack"}, state) do
  [:bright, "Got ", :green, "verack", :reset, :bright, "."]
  |> log()

  {:noreply, state}
end
When we receive our "verack" message, we’ll simply log that it was received.
If we spin up our application, we should see our node connect to its peer node, send a version message, and receive a verack response.
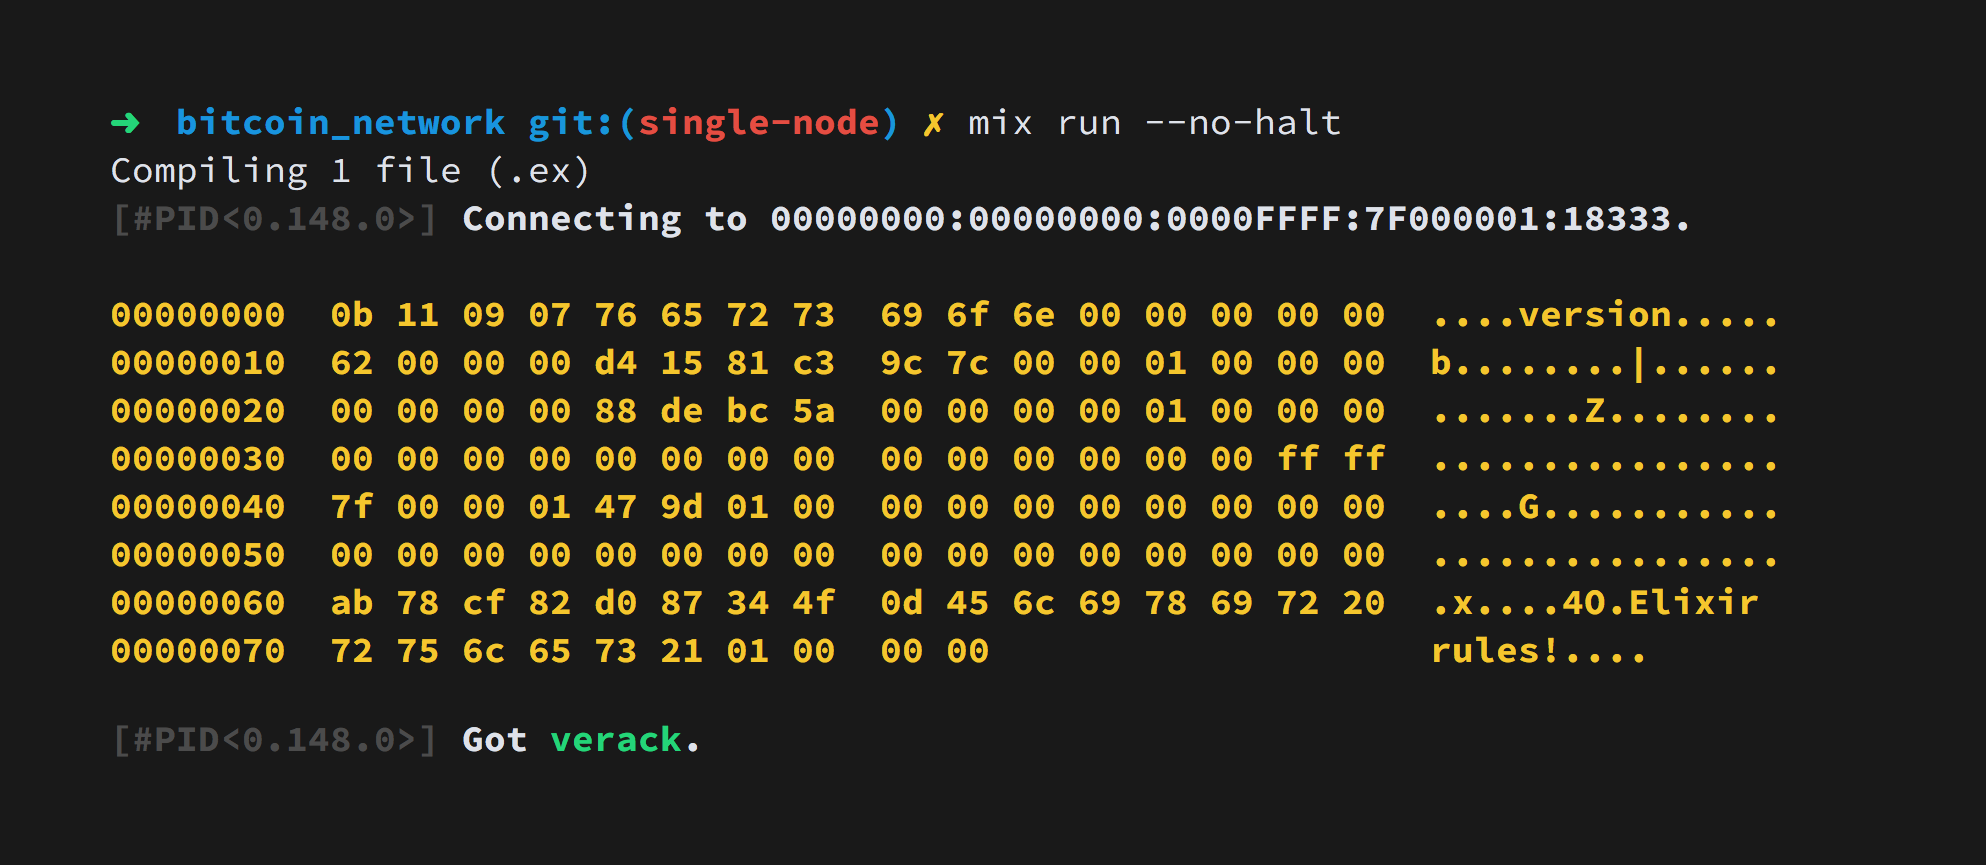
Our verack response.
Receiving Version
In the same way that we sent a version message to our peer node, our peer node will send a version message to our node. If we want to confirm our connection, we’ll have to send back a verack message as a reply.
Just like our version message, we can listen for a verack message by adding a new handle_cast/2 callback and pattern matching on commnand:
def handle_cast(%Message{command: "version"}, state) do
  :ok =
    Message.serialize("verack")
    |> send_message(state.socket)

  :ok =
    Message.serialize("getaddr")
    |> send_message(state.socket)

  {:noreply, state}
end
This time, rather than just logging that we received the message, we’ll two two things. First, we’ll construct and send a verack message. Next, we’ll send a followup “getaddr” message that instructs our peer node to send us all of the peers it’s connected to.
Neither the verack message nor the getaddr message contains any actual content, so our call to Message.serialize/1 will simply set the command on the message and send an empty payload.
Receiving Addresses
Finally, once our peer node receives our request for addresses it’ll start sending back collection of “network address” blocks wrapped in an “addr” message.
Once again, we’ll add a handle_cast/2 callback to listen for this message. This time, we’ll pull the binary payload our of the parsed message struct:
def handle_cast(%Message{command: "addr", payload: payload}, state) do
end
We know that the payload represents an addr message. We’ll need to write a parse/1 method in our BitcoinNetwork.Protocol.Addr module to transform this binary into an Addr struct:
def parse(binary) do
  with {:ok, %VarInt{value: count}, rest} <- VarInt.parse(binary) do
    {:ok,
     %Addr{
       count: count,
       addr_list:
         for <<binary::binary-size(30) <- rest>> do
           {:ok, net_addr, _rest} = NetAddr.parse(binary)
           net_addr
         end
     }}
  else
    _ -> nil
  end
end
We first parse the count “variable integer” out of the message, and then use a binary list comprehension to transform every thirty bytes of the remaining binary into network address structs. Once we’re finished, we return our final Addr struct, fully populated with count and addr_list.
Now that we can parse the addr message sent by our peer node, we can fulfill our second goal. Back in our handle_cast/2 callback we’ll print how many peer nodes we received from our current peer node:
{:ok, addr} = Addr.parse(payload)

[:bright, "Received ", :green, "#{length(addr.addr_list)}", :reset, :bright, " peers."]
|> log()

{:noreply, state}
If we fire up our application, both nodes will exchange version/verack handshakes, our node will ask for a list of peer addresses with a getaddr message, and our peer node will respond with up to one thousand known peers.
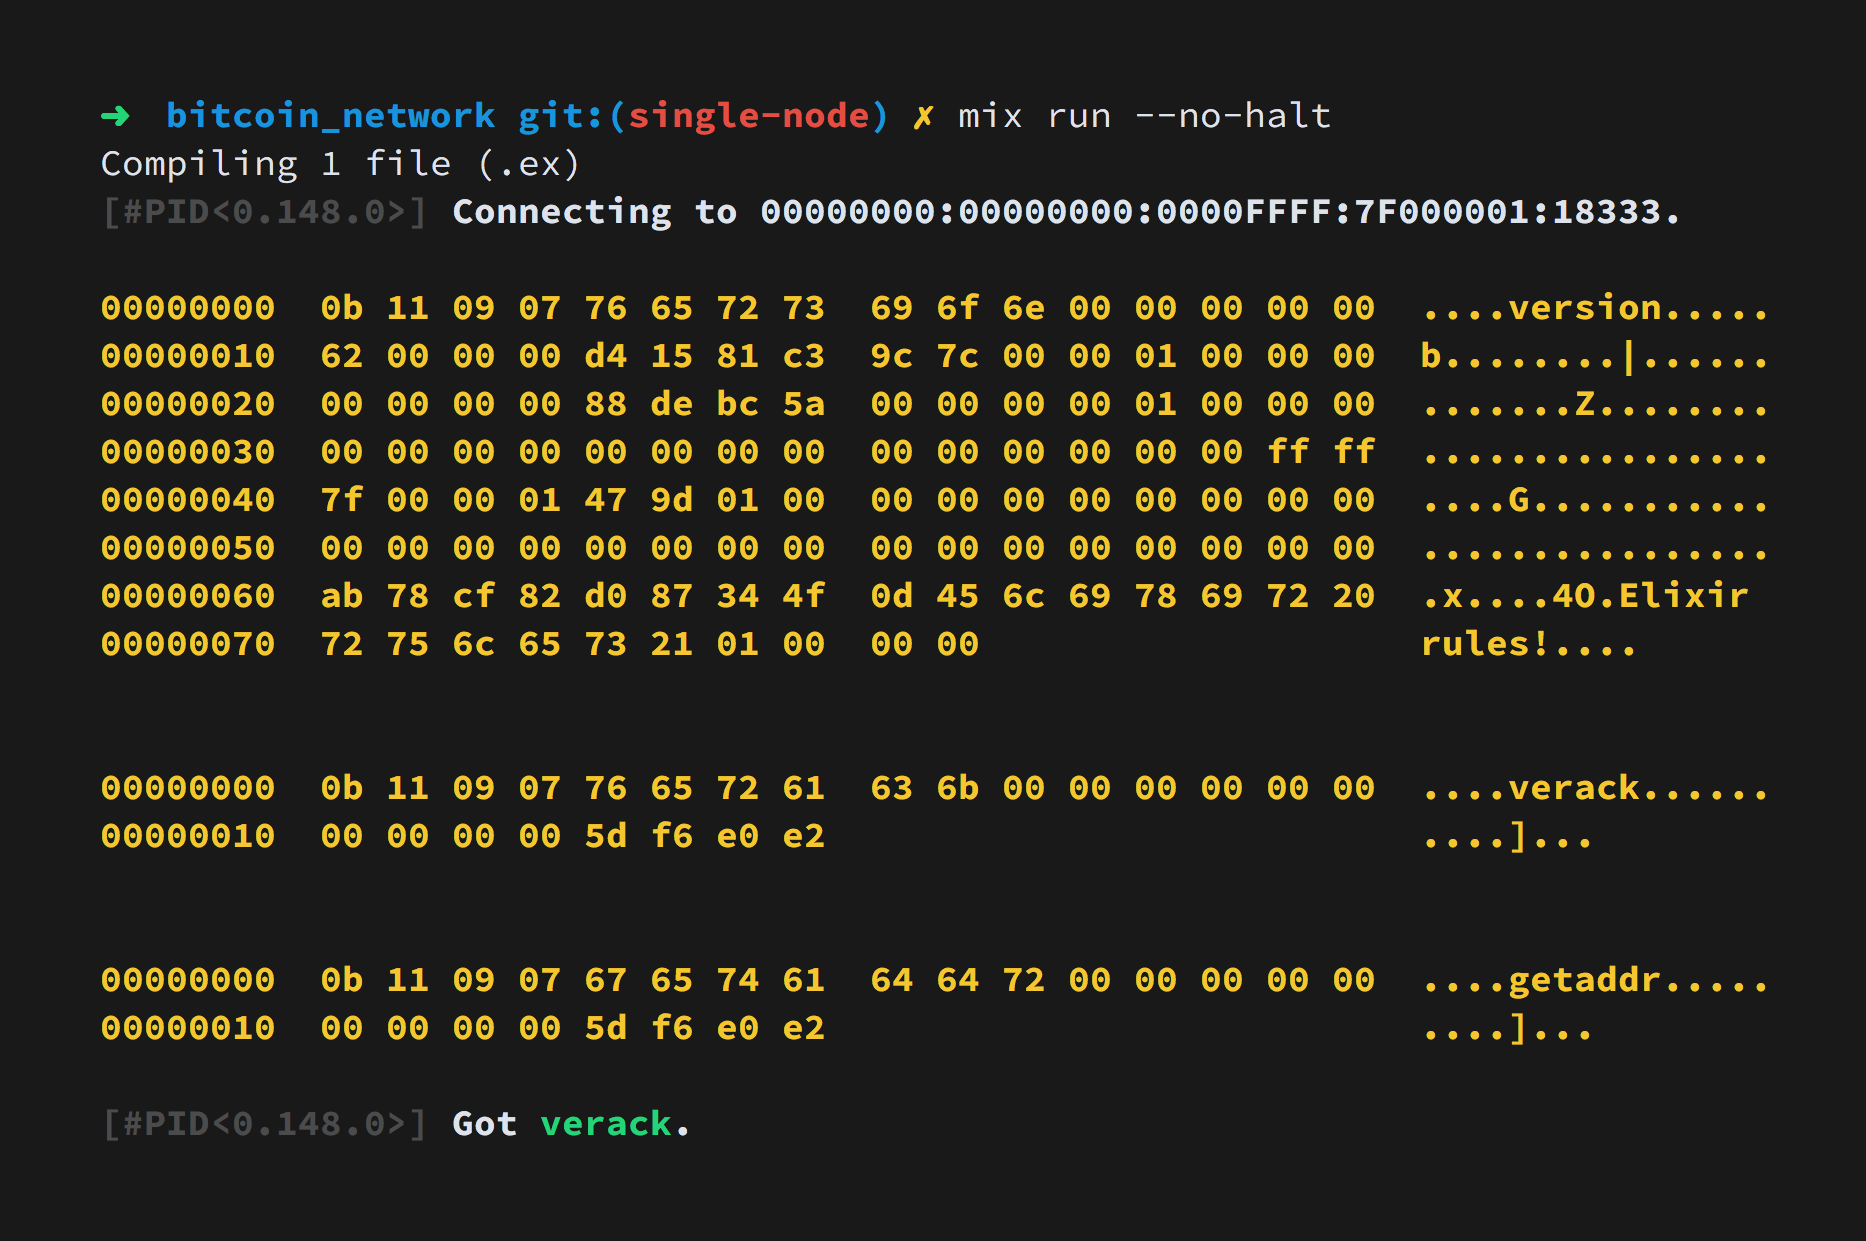
Receiving peer addresses.
Awesome!
Staying Alive
While we’ve accomplished our second goal, we still haven’t completely satisfied our first. In order for our node to stay connected to our peer node, we need to respond to “ping” messages to prove that we’re still alive and able to receive messages.
Let’s add one last handle_cast/2 callback to listen for pings:
  def handle_cast(%Message{command: "ping"}, state) do
    [:bright, "Got ", :green, "ping", :reset, :bright, ", sending ", :yellow, "pong", :reset, :bright, "."]
    |> log()

    :ok =
      Message.serialize("pong")
      |> send_message(state.socket)

    {:noreply, state}
  end
This should be familiar by now. When we receive a ping message from our peer, we log that we received the message and send an empty “pong” message as our response.
That’s all there is to it.
Our “Bitcoin node” should now stay connected to our peer node indefinitely, responding to occasional pings and receiving occasional collections of peer addresses.
Final Thoughts and Future Work
This was a behemoth of a post, but I hope the ideas and techniques are simple enough to follow along with. I tried to break things down by splitting related topics into prior articles, but there’s still quite a bit of ground to cover to get a node up and running.
I’ve got several follow-up articles planned for the near future, including extending our node to map the Bitcoin network by recursively connecting to every node it discovers, and more distant plans of building a fully operational Bitcoin node that verifies incoming blocks and potentially mines for new blocks.
If you haven’t guessed yet, I’m incredibly excited about this project. If you’re interested in exploring Bitcoin through Elixir, let me know!